Friday, July 29, 2011

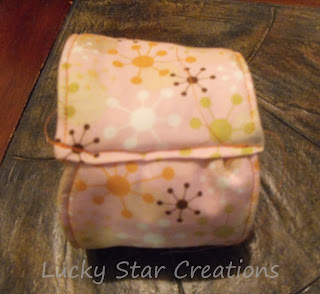
Ice Cream Pint Holder


This tutorial is near and dear to my heart because I've had it on my to do list for some time and never got a chance to do it. I love eating ice cream straight out of the pint like I said on my favorite things post. I never eat it all at once and I hate when it starts to melt from holding it and when I refreeze it the outside tastes a little different. This nifty little cozy not only helps keep your ice cream cold, but it keeps your hands nice and warm too (finger-cicles are never a good thing) and it even has a pocket for your spoon and can hang on the fridge so you always have it on hand.
Disclaimer: I am a newbie at sewing, and I'm known for making things a lot harder than it needs to be, this is the way that I did it, although there may be an easier way, if you know one, please leave a comment and share.
Here Goes!!


Materials:
Outside Print Fabric (or large scrap) I had a quarter yard'
Inside Fabric
Insul-Brite
Coordinating Thread
Empty Ice Cream Pint. If you don't have one, go buy two. Eat one now, Save one to reward yourself when your done.
Round magnets, I got mine from Joann's. They are super heavy duty 18x3mm
Rotary cutter, mat, and ruler. (or good coordination with a regular ruler if you don't have one)
Paper scissors, and fabric scissors
permanent marker
box cutter, or exacto knife
pencil
paper (2 sheets)
Tape
Iron


1. Take permanent marker and mark line where top is on container.


2.Use box cutter or exacto knife to cut along that line, the side seam and the bottom circle


3. Now use your flattened as a pattern and trace on paper. Tape two sheets of paper together so you have enough space to add the inseam. For the top and bottom add a 1/2 inch. on the sides add 1 inch.
I dont have a picture of this because I did it a while ago, but I used my ruler and added small points from the line to where the new line will be, and then played connect the dots all the way around.


4. Cut out your new paper pattern. Then use this pattern to pin and cut out fabric and insul-brite.


5. Next use your rotary cutter ( or ruler if you dont have one) and cut out a rectangle on a folded edge of your outer fabric. The fold should be at the top, and your rectangle should measure 3in wide by 3 1/2in long.


6. The Small rectangle you just cut will be your spoon pocket. To form the pocket, fold under about a half inch on each side, and press to stay

7. Top stitch the top of your pocket (with flaps still folded under). I used this special foot that came with my machine as a guide (if you know what its called, leave a comment to tell me please). I lined up the small size on the right with the top of my pocket.(the fold). Sorry about the bad picture, it was hard to take a good one.

8. Pin the pocket to the middle of the outside fabric. To find the center I gently folded and creased and lined up creases. You could just eyeball it, but i'm not that skilled.

9. Next, sew down pocket using the same method as the top stitch that you just made. Start stitching where the top stitch is. Hint: for the left side, start at the bottom so you can still use the foot as your guide .


10. Cut a square of scrap fabric larger than your magnet, I didnt initally measure but mine came to about 1 1/2 inch but whatever works for your size magnet. This is going to be stitched to the left side of your insul-brite to hold down your magnet. Again I used the smaller presser foot and pivoted the corners. After I did 3 sides, I slid in the magnet, and finished stitching the last side to close. This is a little tricky because when doing the last side, the magnet sticks to your throat plate.

11. Now you can stack and pin your fabric layers in this order.
Insul-Brite, With magnet facing down
Outside fabric, With pocket facing up
Inside fabric, right side down

12. Sew the top and bottom sides down using a 1/2 inch inseam. don't forget to back stitch at the beginning and end of each side. I also switched my presser foot back to the normal one for this.


13. Now you have a tube. turn it to the right side and press down so that it is nice and flat and even. Now you can top stitch the top and the bottom using the same foot as when you made the pocket. Leave about a half inch on each side that is not top stitched. (start 1/2in. in, stop with 1/2in left)

14. Take the side without the magnet next to it and turn in the fabric about a half inch to hide raw edges. Press to stay. To reduce bulk, I cut a small piece of the insul-brite out on that side. you can also do a small piece on the other side to.

15. Slide the end with the magnet in that opening about a half inch in. Pin down. Start sewing from the bottom. This is a little tricky. Be careful not to sew both sides together, because ripping seams is no fun, trust me. I tried to get a pic as i was doing this but I was having trouble at first and forgot. but here is the sewn line


16. This last step is not a must do, but I did it anywy. Go over the top stitching at the top and bottom over the seam you just made to reinforce. Mine was a little uneven at the top, and the back was a little loopy because i had to feed it through myself.


Now pat yourself on the back and take that second pint and reward yourself for a job well done.

If you dont want to eat it now, flatten it, and place it on your fridge so its ready when you need it.


Since this was created and written by me and things in my head may not make sence to other people. If you are confused by anything feel free to leave a comment and ask and I will clear it up to the best of my ability.


Join  us Saturdays at tatertotsandjello.com for the weekend wrap 
 up           party!

Thursday, July 21, 2011

6 Things I Love

Amy over at Mod Podge Rocks did a post like this and I liked it so much I wanted to steal borrow the idea too. Check out her 5 here. I did six because I couldn't narrow it down to just five.

[Photo]

1. Strawberry Banana smoothies from McDonald's. My love of this flavor of smoothie started a long time ago from the frozen yogurt place in our local mall. Once Mickey D's got these, which was a lot easier to get then driving 30mins to the mall, I fell in love with them all over again. In my opinion, greatest things ever!


[Photo]

2. Let's Make a Deal. This comes on CBS at 10am (eastern). I absolutely love this show, I watch it everyday and I'm dying to be on it. Yesterday I finally thought of what costume I wanted to wear: A cute cow costume, it will consist of a cow print dress and a headband with cow ears, and a cowbell necklace. When I get the money to go to California and go, I will definitely post on my diy costume.


[photo]

3. Google Reader. Since I am new to the blogosphere, I love following all of the crafty blogs that brought me the inspiration to blog myself, and the new ones I find everyday. I love reading my blogs through google reader so I can have all my favorites in one place and I never miss a good post. To see all the blogs I love, just check out the list on my sidebar.


4. Ravelry. I have been a member of this website for a long time and never really used it. Lately I've been wanting to crochet since I'm limited space for now. I love all of the free patterns I can find here, they have a little bit of everything. Lately I've been working on a doll for Naomi. I'm using different elements from different patterns to get it right, I'll show you guys when its done.


5. My Tervis tumbler. I got the  24oz Cherry Blossom one from Bed Bath & Beyond. Mine has a light pink top because I switched it from another cup. I use this for everything, hot or cold it keeps its temp for a long time. Since its microwaveable I can make my tea right in it. The fact that it's a clear insulated mug made me had to have it, although I thought it was a little expensive at first, with a 20% off coupon it was worth the extra few bucks. I'm going to go back to get the handle that goes to it soon.


6. Ben & Jerry's Banana Split pint. Eating ice cream straight out of the pint to be is pure bliss. If you have not tried this flavor before, you got to. I used to be addicted to their Strawberry Banana FroYo, sadly they discontinued it, and tried this one as a request by one of the customer service reps and love it. I eat ice cream with a baby/toddler spoon. I don't know why, but it makes it better. My spoon + a pint = my guilty pleasure

I know this will change soon and that my "it" things will switch up, don't worry, I'll keep you posted if it does.

What are you into? leave a comment telling me your 5 favorite things of the moment.

Wednesday, July 20, 2011

Make Your Own Buttons


I saw this post over on over on Craft Gossip and I thought it was amazing. Sometimes I have a vision of a project in my head and get frustrated when I can't find exactly what I'm looking for. In fact I was having this problem yesterday when working on a design for a duvet, I wanted cute buttons for it and couldn't find exactly what I wanted online. ( I know right, you can find everything online) I thought of making polymer clay buttons, but that was no good because they break. These custom buttons made from shrink paper over on S.P.W. (Scissors. Paper. Wok.) are amazing! Get the tute and make your own! I know I will.

Photo from [S.P.W.]

Tuesday, July 19, 2011

TuneUp your iTunes

Let me start off by saying that this is really not a craft related post, but it was something that made me happy and I had to share.

I've seen the commercials on TV for TuneUp for a while but I never remembered what it was when I got to the computer to try it out. If you don't know what it is, its an application that works with your iTunes or Windows Media Player and cleans up all your blank information such as track titles, album and artist names, album art, etc.
Anyone who knows me knows that I am very anal about my iTunes being organized. I Put some CDs on there for some friends when I didn't have Internet and some were mixed CDs and not having titles to songs an album art was bugging me. I had no way of doing this myself because I didn't know the songs so this thing was a god send.
After I downloaded the program and started it, it also loaded my iTunes, I selected the songs without actual names and dragged them to the box, and a few minutes later it had all the info that was missing and all I had to do was save. It also had a separate feature to find missing album art which I liked because it could find the ones that iTunes could not. It does have a thing to find duplicate songs, but I didn't need that.
Now that my iTunes is back in harmony again, all I need now is something to automatically add the lyrics to the song so I have them on my iPod if I need them., now that would be AMAZING!

a new iPod wouldn't hurt either :)

Monday, July 11, 2011

Moo Cow Marshmallow Pops


I LOVE cows. They are my all time favorite animal, eventually I want a pet cow and name her Latte. yeah, its that serious. When I was doing my morning blog reading I came across this adoriable little guy via Craft Gossip. It orginally comes from Cute Food for Kids, and it totally makes me want go buy some marshmallows and make a whole herd of them :) Find out how to make them here.